Morning all. I can hardly believe it's October ALREADY and, despite the lovely Indian Summer we've been having, I can definitely feel Autumn in the air so it seems a good time to share my pumpkin step outs with you. I hope they will be useful and encourage you to have a go yourselves. It really is too easy for words.
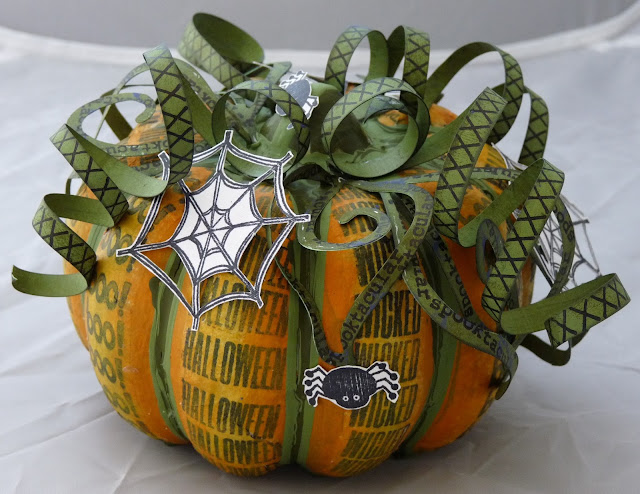
Here, just to remind you what I'm talking about, is a picture of the pumpkin I made for Emma Godfrey's recent stamp release for PaperArtsy.
Because there are quite a lot of steps I'm going to do this in two posts. First we'll deal with the construction of the pumpkin and then we'll move on to the decoration.
None of it is at all difficult, but you do need a little patience, and you'll see why as we go along.
This is what you need:
A large balloon
Toothpaste lid/tomato puree lid/drinks carton lid for the stalk
Some large, thin elastic bands
newspaper, tissue paper
PVA Glue
Cling film (not vital but it helps)
A large paintbrush
Something to balance the balloon on while you construct the pumpkin and while it dries
Step One (this is where your patience will be tested a little)
Blow up your balloon, stretch the elastic bands around it to form sections and then leave it alone for a couple of days. You want the balloon to go down a bit so that you've got some give in the rubber. You need to do this to get the sections of the pumpkin started. You'll see what I mean as we go along. Basically what you're doing is stretching the rubber to give it more flexibility. If you just put less air in the balloon it won't stretch the rubber as much AND the end result is that your pumpkin will be smaller.
After a couple of days you should notice that your balloon has gone down a bit and the rubber is looking thicker and a bit more stretchy. Having the elastic bands around it will have helped to press it into shape a bit and will be a useful guide going forward.
Now cover your balloon with the clingfilm to form a non stick barrier between the papier mache and the balloon. This will stop the balloon pulling your pumpkin out of shape as it shrinks further inside the papier mache shell.
Now you can start to construct the papier mache shell.
Tear up lots of strips of newspaper aiming for pieces no bigger than about 3" in size. If you try to rush it and go for large pieces you often lose detail.
Now make a half and half mixture of PVA glue and water, stirring it until it is thoroughly mixed.
I started by glueing a large sheet of tissue paper all the way around the balloon to give me a nice base for the papier mache. Paint the pva mix straight onto the tissue paper and then wrap it around the balloon, smoothing with your hands as you go. When it's covered with tissue, using the elastic bands as a guide, tie string around it to form sections like I have in the picture below. Tie them a little bit tight so that the balloon pushes through the string a bit to form rounded sections like a pumpkin. Trim the ends of the string quite short at the top.
Now, dipping your pieces of paper into your glue mixture as you go, coat the paper with glue and stick it to the ballon IN BETWEEN the pieces of string. Leave the string visible to use as a guide. You're going to drip paint over them at the end so don't worry about covering them up at this stage. What's important is that you can see where the sections are AND that you build each section up in the centre to form a nice curve.
You can see here that the sections are beginning to take shape. You can still see the string running down the side as a guide and I've built the centres up to give the pumpkin shape. Keep going around the pumpkin adding layers of paper until you are happy with it. Don't be tempted to skimp. The less paper you put on, the flimsier the finished product will be and the more prone to damage.
I tend to do three layers at a time and then leave it to dry overnight before adding more layers. Once you get going it comes together really quickly. If you try to pile too much soggy paper on it in one go you stand more chance of it collapsing AND it will take longer to dry thoroughly at the end so it's worth exercising a bit of patience at this stage. I find it useful to balance the piece on a vase while I'm constructing it and while it's drying too.
Here is the completed pumpkin. I've coated it with more white tissue paper to stop the newsprint bleeding through the paint. You can see the sections are still clearly defined and I've stuck the drinks carton lid on the top to cover the knot and form a stalk. I've covered the lid with a couple of layers of white tissue to hold it down firmly and give a good surface for painting.
So, as you can see, nothing difficult there. I hope this has helped and will encourage you to give it a go yourselves. If I've left anything out or if you want further clarification please don't hesitate to ask.
Next time I'll show you how I decorated the pumpkin, using very simple painting and stamping techniques.
Hope to see you again soon.
Lx


Woo Hoo, I'm not entirely sure I have that kind of patience but it's looking FABULOUS missus ... already looking forward to episode II
ReplyDeleteKathyk
I KNOW I don't have the patience - looking forward to the decorating episode!
ReplyDeleteGreat idea Lauren. Finished item is pure genius. You are such a clever girl, my friend.xxx
ReplyDeleteFab...takes me back to my school days with the papier-mâché balloon! X
ReplyDelete:oD Me too Clare x
DeleteYou must have the patience of a saint mate! Great tute, you make it look so easy.
ReplyDeleteLooking forward to seeing how you did all the painting and fiddly decorations.
Alison xx
The finished pumpkin is spectacular Lauren, thank you for sharing the process - I can't wait for the next instalment.
ReplyDeletePauline
x
I LOVE the finished pumpkin, WOW, haven't played with paper mache since I was a child. you made it sound simple. Great job and what a pretty center piece for a table!! LOVE IT.
ReplyDeleteHugs
Sue
This is a fabulous project Lauren. Such a lot of work and a fabulous tutorial from you.
ReplyDeletex catherine
This is wonderful project and great tutorial Lauren!! Can't wait next step!! xx
ReplyDeleteOh yay! Thank you so much for this brilliantly detailed and photographed step-out... I'm definitely going to give this a go (when I get anywhere near my craft table). Looks like lots of messy fun quite apart from anything else! Looking forward to part two.
ReplyDeleteAlison xx
what a great idea and you certainly have the patience of a saint! x
ReplyDeletelooks awesome!!
ReplyDelete