Wednesday 28 October 2015

HALLOWEEN VOTIVE - A "FLOCK" OF CROWS

Evening everybody.

I love this votive kit by That's Crafty.  I've used their Dinky Crow Stencil (one of my favourites), some Dreamweaver stencil paste and some black flock for the crows. The tree is stamped in black and embossed with clear embossing powder. The wrought iron fence is stamped and embossed in black to bring it to the foreground.  When lit, the votive will cast crow shadows around the room.


You may notice the panels at the side don't look as clear and shiny as they should. That would be because I forgot to take the backing film off one side of the panel. I've only just realised as I was uploading the photo's. Duhhhh.. What a Plum! If you haven't used acrylic before. Don't forget to remove the backing film from BOTH sides - LOL

Lx

Tuesday 27 October 2015

ACRYLIC HALLOWEEN BOOK

Morning all

I'm excited to tell you That's Crafty are adding to their range of acrylic items and I've been asked to make some pieces for the shop. Acrylic is fast becoming a staple item in my crafty stash. It will take lots of different mediums and you can just keep on layering to your heart's content. The tags and ATC's  are already a firm favourite so I'm really looking forward to working with the new pieces in the range.

Of course, there are lots and lots of things you can do with acrylic but lets start at the beginning and do what I think will naturally come to mind when dealing with a clear material like acrylic. For my first piece I wanted to build a scene through an album so that when you look at the front you get a sort of 3-dimensional picture.


(apologies as it's a bit of a nightmare to photograph but the end result is pretty darned cool if I do say so myself). The album is now in the shop if you're in the area and want to have a look at it close up.

Below are the individual pages photographed in front of white paper. I've kept everything really simple to illustrate how easy it is to build an effective scheme, but there's plenty of scope to add colour, drips, anything you like really.

I've used some of my favourite Halloween stamps by PaperArtsy (Hot Picks HPHW02 and HPHW03) and Tim Holtz (The Undertaker). They mix and match beautifully.


And when you put them all together they look like this


Unfortunately, what you lose with the photograph is dimension but take it from me, it really is very effective when you're actually holding the book in your hands.

I've mostly used black archival ink and black embossing powder. I deliberately didn't use an embossing pad because I wanted a slight bloom around the images to give them a more distressed look. Where I wanted paler shades, on the cobwebs and the trees, I've used black archival ink with clear embossing powder. You get a lovely contrast that way and it adds a sense of depth.

The album I've used was 6x6 and I enjoyed making it so much I've already started another one with a winter theme.

Tomorrow I'll be sharing an acrylic votive from the new range using one of my favourite Mini stencils and some black flock...

Don't just take my word for it, Mark Gould ( has been doing some amazing stuff with acrylic ATC's and I'm really looking forward to his upcoming workshop at That's Crafty on 7th November.

Lx

Friday 23 October 2015

QUICK AND EASY HALLOWEEN CARDS AND BOXES

I love Halloween. Its such fun AND a great excuse to make stuff, so for me it's a win/win. I really can't get enough of Emma Godfrey's fab Halloween stamps at the moment so I knew I wanted to use them for my Halloween trick or treat boxes and cards this year. I've always got a lot to make so they need to be quick and easy. Here's what I came up with.


Cute or what!? I'm so pleased with them.

I usually fill the boxes with a mixture of tricks and treats, so some people will get a trick and some people will get a treat. It makes it much more fun when you don't know what you're going to get and there's usually a bit of bartering goes on afterwards :oD

Lx

Monday 19 October 2015

FACES AT PAPERARTSY - TOPIC 19

I'm sorry I've been such a bad blogger lately. I've been racing around like a loon behind the scenes working on lots of different things. Loads of exciting things happening and lots to share with you in the coming months. I'm up to my eyes in projects and loving every minute.

I've got quite a tight schedule at the moment with one thing and another but I had to take a bit of time out today to join in with the faces topic at PaperArtsy. Week one has been so inspiring already and I can't wait to see what this week brings.

I'm the first to admit that I'm not brilliant at drawing but I do enjoy it. If you remember, I had a bit of trouble with drawing hair recently and that was my starting point with this picture. I wanted it to be humorous and to express my frustration with the whole business of drawing hair. I decided to face the fear, grab pencils at random from the box and just go for it..... It was SO MUCH FUN :oD


Ha! Ha! She really makes me laugh. The poor girl really needs to run a comb through all that wild hair but really, where would you start!? I'm already looking forward to picking up my pencils again soon.

Lx


Friday 9 October 2015

PAPIER MACHE PUMPKIN STEP OUTS PART 2 - DECORATING THE PUMPKIN

Hello again. Here, as promised, are the step outs for decorating the pumpkin. Hope you enjoy... In case you missed them, instructions for the papier mache pumpkin are on the previous post.

Here, to remind you, is the picture of the finished pumpkin I made for PaperArtsy last month


I used Emma Godfrey's Halloween set of stamps EEG11


So lets get started....

First I coated the pumpkin in a base layer of white gesso to give me a nice even base.


Of course, I used PaperArtsy Fresco Paints for my pumpkin because you get a really nice finish, they cover, layer and pour beautifully and they dry nice and quickly.  The colours I've used are, unsurprisingly, Pumpkin Soup (go figure!?), Tango, Tinned Peas and Green Olives.

When the gesso was dry I painted the whole pumpkin with a layer of Pumpkin Soup Fresco Paint.


While that was drying I stamped rows of words onto strips of tissue paper before glueing them to the pumpkin (apologies as I forgot to photograph this step because I'm a numpty). 

I stuck the tissue strips onto the pumpkin segments using mod podge to glue and seal them (you could use glue and seal, gel medium or PVA glue).


When the tissue was dry I painted a layer of  Tango Fresco Paint over the top, making sure to blend in around the edges of the tissue paper. I used a baby wipe to wipe back some of the paint over the wording.


Now for the really fun bit

I took the greens - lightest first - and carefully poured them from the top of the pumpkin near the stalk so that they ran down between each segment. Before the light green was dry I dripped some dark green over the top to give a nice contrast and then left it to dry.


Next, I painted some A4 card with the lighter green.  I die cut my leaves using a lovely Sizzix die I've had for absolutely ages.  I painted some quilling strips green and used those for the curly bits on top of the pumpkin.

 
Next, I stamped words from the stamp set and stamped randomly over the leaves and the quilling strips. I wrapped each quilling strip tightly around a screwdriver to get the curls.


I arranged the leaves and swirls so they tumbled across the top of the pumpkin


Last but not least I stamped and embossed the spiders and spider webs before fussy cutting and adding to the top of the pumpkin.


And there you have it. Job Done....


You can see I picked out a couple of the words on this one in black (just to see what it would look like if I'm honest). I think these would look great in a group. This one has turned out bigger than the first one because I was in a bit of a rush and didn't wait for the balloon to shrink down quite as much. I think they look much more convincing in different shapes and sizes though so I wouldn't get too bent out of shape about size etc.

OF COURSE you can pimp up your pumpkin any way you like but I hope this has given you some ideas. All the stamps and paints I used can be ordered from PaperArtsy or bought at your nearest PaperArtsy Stockist.

Lx

Sunday 4 October 2015

PAPERARTSY PUMPKIN STEP OUTS

Morning all. I can hardly believe it's October ALREADY and, despite the lovely Indian Summer we've been having, I can definitely feel Autumn in the air so it seems a good time to share my pumpkin step outs with you. I hope they will be useful and encourage you to have a go yourselves. It really is too easy for words.

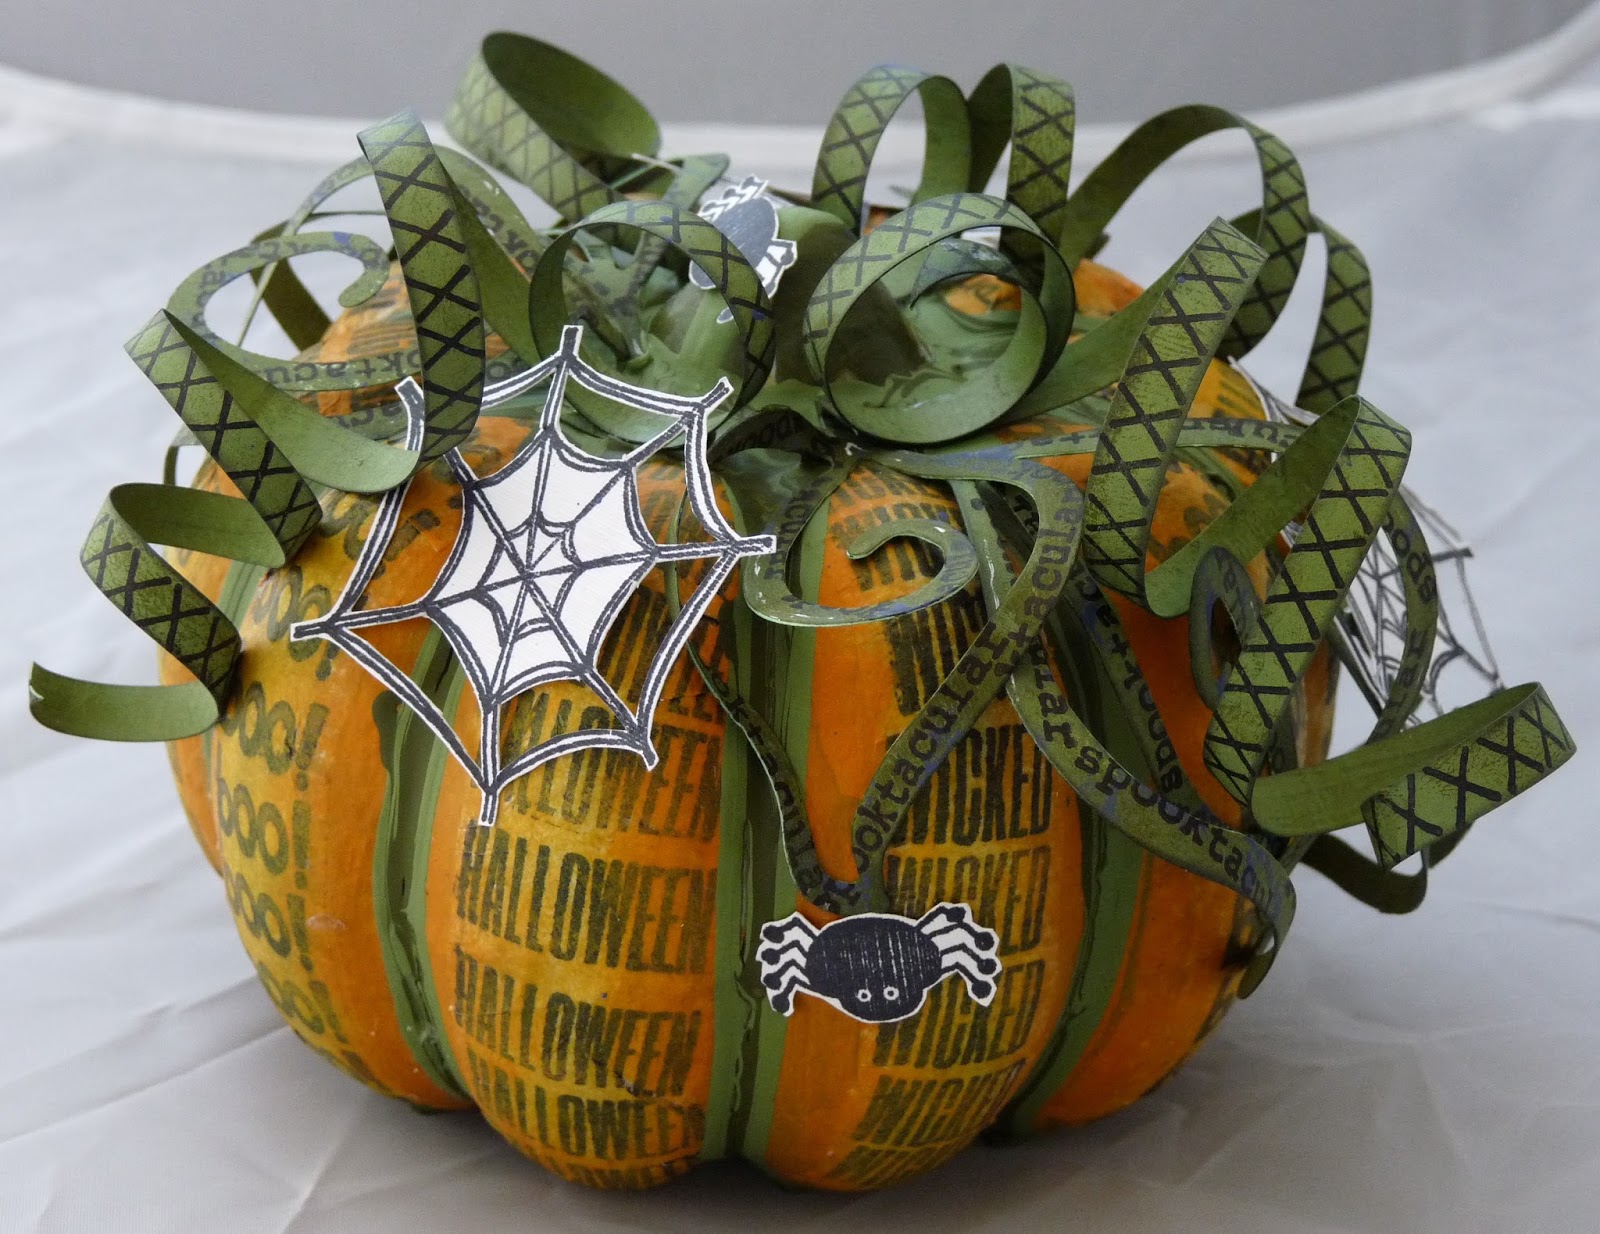
Here, just to remind you what I'm talking about, is a picture of the pumpkin I made for Emma Godfrey's recent stamp release for PaperArtsy.


Because there are quite a lot of steps I'm going to do this in two posts. First we'll deal with the construction of the pumpkin and then we'll move on to the decoration.

None of it is at all difficult, but you do need a little patience, and you'll see why as we go along.

This is what you need:

A large balloon
Toothpaste lid/tomato puree lid/drinks carton lid for the stalk
Some large, thin elastic bands
newspaper, tissue paper
PVA Glue
Cling film (not vital but it helps)
A large paintbrush
Something to balance the balloon on while you construct the pumpkin and while it dries

Step One (this is where your patience will be tested a little)

Blow up your balloon, stretch the elastic bands around it to form sections and then leave it alone for a couple of days. You want the balloon to go down a bit so that you've got some give in the rubber. You need to do this to get the sections of the pumpkin started. You'll see what I mean as we go along. Basically what you're doing is stretching the rubber to give it more flexibility. If you just put less air in the balloon it won't stretch the rubber as much AND the end result is that your pumpkin will be smaller.

 
After a couple of days you should notice that your balloon has gone down a bit and the rubber is looking thicker and a bit more stretchy.  Having the elastic bands around it will have helped to press it into shape a bit and will be a useful guide going forward.

Now cover your balloon with the clingfilm to form a non stick barrier between the papier mache and the balloon. This will stop the balloon pulling your pumpkin out of shape as it shrinks further inside the papier mache shell.


Now you can start to construct the papier mache shell.

Tear up lots of strips of newspaper aiming for pieces no bigger than about 3" in size. If you try to rush it and go for large pieces you often lose detail.

Now make a half and half mixture of PVA glue and water, stirring it until it is thoroughly mixed.

I started by glueing a large sheet of tissue paper all the way around the balloon to give me a nice base for the papier mache. Paint the pva mix straight onto the tissue paper and then wrap it around the balloon, smoothing with your hands as you go. When it's covered with tissue, using the elastic bands as a guide, tie string around it to form sections like I have in the picture below. Tie them a little bit tight so that the balloon pushes through the string a bit to form rounded sections like a pumpkin. Trim the ends of the string quite short at the top.


Now, dipping your pieces of paper into your glue mixture as you go, coat the paper with glue and stick it to the ballon IN BETWEEN the pieces of string. Leave the string visible to use as a guide. You're going to drip paint over them at the end so don't worry about covering them up at this stage. What's important is that you can see where the sections are AND that you build each section up in the centre to form a nice curve.


You can see here that the sections are beginning to take shape. You can still see the string running down the side as a guide and I've built the centres up to give the pumpkin shape.  Keep going around the pumpkin adding layers of paper until you are happy with it. Don't be tempted to skimp. The less paper you put on, the flimsier the finished product will be and the more prone to damage.

I tend to do three layers at a time and then leave it to dry overnight before adding more layers. Once you get going it comes together really quickly. If you try to pile too much soggy paper on it in one go you stand more chance of it collapsing AND it will take longer to dry thoroughly at the end so it's worth exercising a bit of patience at this stage.  I find it useful to balance the piece on a vase while I'm constructing it and while it's drying too.


Here is the completed pumpkin. I've coated it with more white tissue paper to stop the newsprint bleeding through the paint. You can see the sections are still clearly defined and I've stuck the drinks carton lid on the top to cover the knot and form a stalk. I've covered the lid with a couple of layers of white tissue to hold it down firmly and give a good surface for painting.

So, as you can see, nothing difficult there. I hope this has helped and will encourage you to give it a go yourselves. If I've left anything out or if you want further clarification please don't hesitate to ask.

Next time I'll show you how I decorated the pumpkin, using very simple painting and stamping techniques.

Hope to see you again soon.

Lx