from Paperartsy. I love what you can do with them. The texture is great and you can get some really great effects. Check this out. I haven't decided what I'm going to do with it yet but, having tried a few ideas out on tags I wanted to move to a larger surface.
I've used Orchid, Candy Floss, Mermaid and South Pacific to create this. No thinners or relaxers required and no special base. Just pour straight onto your canvas and this is what you can do...
Cool huh! Though not, I hasten to add, a technique for the super tidy and/or super frugal crafter. You do need a fair bit of paint for this and you won't need to mind letting it fall off the canvas (though I let mine drop onto a glass mat and mopped it up with tags and you can get some great effects). Just look at the dimension on those dots. They are literally just where I dropped dots of paint onto the canvas after the first layer was dry and left them to see what would happen.
Now all I have to do is decide what I want to do with it next...
Lx
Wednesday, 15 April 2015
STILL PLAYING WITH MY FAB FRESCO PAINTS
Tuesday, 14 April 2015
GRUNGE GRUNGE GRUNGE CHALLENGE AT THAT'S CRAFTY
I couldn't resist the Grunge, Grunge, Grunge challenge at That's Crafty this week
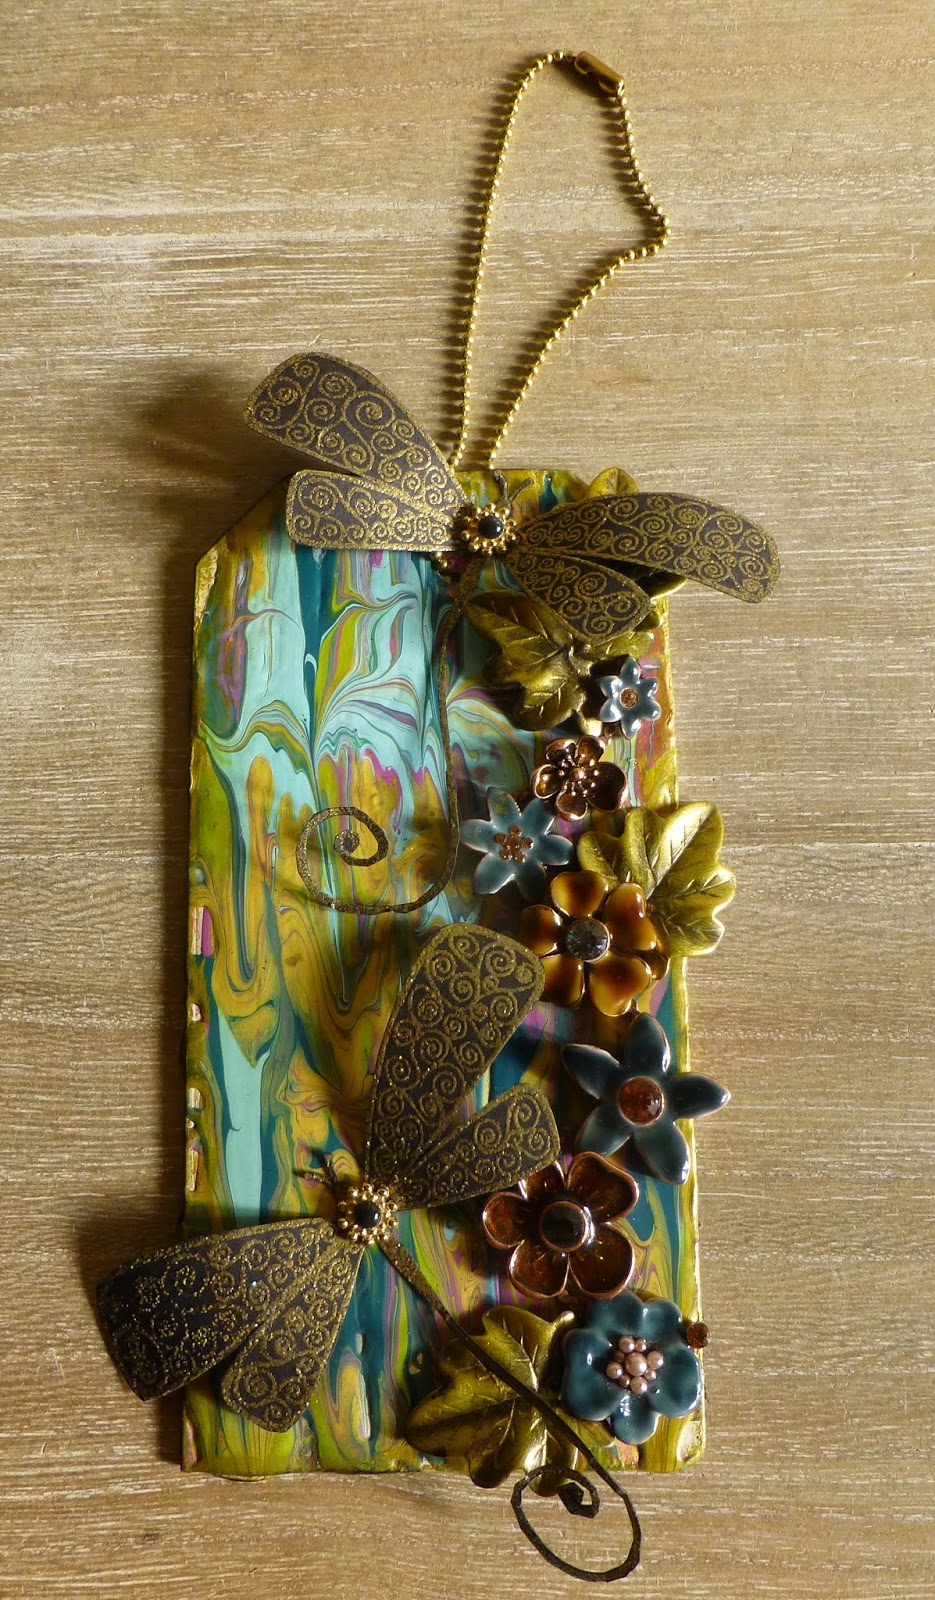
I used Fresco Paints by PaperArtsy for the background and Treasure Gold on the metal leaves and flowers in Aquamarine and Spanish Gold. I painted the wax straight onto the metal, heated and let them cool before buffing and you get this cool enamelled effect. I mixed them up with some pieces from a broken necklace I had and you can't tell the difference between the two. Impressive! I clearly NEED more Treasure Gold in my life :oD
I'd forgotten how much I LOVE these Squiggly Ink dragonflies from PaperArtsy. I think they look great stamped on black card and embossed in gold. All they needed was a little bead spacer topped with a black pearl to finish.
Lx
I used Fresco Paints by PaperArtsy for the background and Treasure Gold on the metal leaves and flowers in Aquamarine and Spanish Gold. I painted the wax straight onto the metal, heated and let them cool before buffing and you get this cool enamelled effect. I mixed them up with some pieces from a broken necklace I had and you can't tell the difference between the two. Impressive! I clearly NEED more Treasure Gold in my life :oD
I'd forgotten how much I LOVE these Squiggly Ink dragonflies from PaperArtsy. I think they look great stamped on black card and embossed in gold. All they needed was a little bead spacer topped with a black pearl to finish.
Lx
Tuesday, 31 March 2015
DRAGON'S DREAM TAG IT ON #187 - TOFFEE AND LACE
So, Toffee And Lace. How hard could it be...but...I REALLY had to think about this one and I'm not really sure why. I was determined to find an alternative way to include the lace theme as I'm not really a lacey person as a rule. I decided to use a lacey leaf stamp set I've had for ages and I hope that will be okay.
In the end I decided to break out my alcohol inks. I used Butterscotch (for the toffee element), Terracotta and Willow to create a background by splodging them on a glass mat and swiping the tag through the ink. I used what was left on the mat to colour some seam binding. I then stamped an assortment of butterflies in black Archival Ink. Once that was dry I overstamped lacey leaves in gold and then over that I stamped the words Le Papillon and some smaller lacey leaves in white. I really love how it turned out. I edged the tag with black ink and left it at that.
you can see the gold better in this picture
I think I might just about squeak in for this challenge. Must do better next time.
Lx
In the end I decided to break out my alcohol inks. I used Butterscotch (for the toffee element), Terracotta and Willow to create a background by splodging them on a glass mat and swiping the tag through the ink. I used what was left on the mat to colour some seam binding. I then stamped an assortment of butterflies in black Archival Ink. Once that was dry I overstamped lacey leaves in gold and then over that I stamped the words Le Papillon and some smaller lacey leaves in white. I really love how it turned out. I edged the tag with black ink and left it at that.
you can see the gold better in this picture
I think I might just about squeak in for this challenge. Must do better next time.
Lx
Monday, 30 March 2015
Wednesday, 11 March 2015
DRAGONSDREAM TAG IT ON #186 - WHITE AND A NUMBER
Another great challenge over at DragonsDream and I have set myself the additional challenge that I can only use stuff from my scrap box (sooooo many scraps; so little time :oD) so this is what I came up with
The image and sentiment are from a great set by Viva Las Vegas Stamps. The sentiment cracks me up every time I see it. I chose to stamp them onto Kraft card and coloured the image with Prisma Pencils.
I tore around the image to reveal the white core and edged the tag with white paint. I also stamped my sentiment in white and heat embossed it just to tie in the theme a bit more. I hemmed and hawed a bit when it came to adding the number element so I was pleased to find I had a piece of kraft paper with numbers on in my scrap box AND I found this cute staple with the word "Giggles" on it. Seemed appropriate so on it went.
HAD to use a bulldog clip for the top again. I really like that and it seemed to balance the tag as well as tying in with the silver staple quite nicely. Job done. Can't wait to make the next one now. I think I'm hooked.
Lx
The image and sentiment are from a great set by Viva Las Vegas Stamps. The sentiment cracks me up every time I see it. I chose to stamp them onto Kraft card and coloured the image with Prisma Pencils.
I tore around the image to reveal the white core and edged the tag with white paint. I also stamped my sentiment in white and heat embossed it just to tie in the theme a bit more. I hemmed and hawed a bit when it came to adding the number element so I was pleased to find I had a piece of kraft paper with numbers on in my scrap box AND I found this cute staple with the word "Giggles" on it. Seemed appropriate so on it went.
HAD to use a bulldog clip for the top again. I really like that and it seemed to balance the tag as well as tying in with the silver staple quite nicely. Job done. Can't wait to make the next one now. I think I'm hooked.
Lx
Saturday, 28 February 2015
HMFMC#188 FRIENDS
Just about squeaking in with this one as I coloured an image earlier in the week and then hated it when I matted and layered it. I had to start again from scratch...plahhhh
Anyhoo, this week's challenge at House Mouse and Friends Monday Challenge is Friends and if you're in a tight squeeze like this little guy then one thing you most definitely need is a Friend. With Spring in the air I couldn't resist this gorgeous image with Forsythia in it. I love it.
As ever, my weapons of choice were Copics and Prisma Pencils and I added a little sprig of silk Forsythia
I glossed the bird feeder for a bit of added dimension too
Have a great weekend all.
Lx
Anyhoo, this week's challenge at House Mouse and Friends Monday Challenge is Friends and if you're in a tight squeeze like this little guy then one thing you most definitely need is a Friend. With Spring in the air I couldn't resist this gorgeous image with Forsythia in it. I love it.
As ever, my weapons of choice were Copics and Prisma Pencils and I added a little sprig of silk Forsythia
I glossed the bird feeder for a bit of added dimension too
Have a great weekend all.
Lx
Friday, 27 February 2015
Pink, Hearts and MORE PINK....
I've been footling about with a tag for a challenge I spotted on Catherine's blog recently. I love making tags and they're a great way to use up all those little bits and bobs you accumulate AND try out different techniques on a smaller scale. It all started when I found this lovely Stampotique girlie in my stash, long neglected and needing some TLC. Quick as a flash I coloured her in before rummaging through my offcuts to see what I could do to brighten her life a little...
First I needed some layers, so I painted a tag with Orchid Fresco paint by PaperArtsy before layering some dots over the top with texture paste. I've discovered that the paste sucks the colour of the paint up as it dries so I got a gorgeous soft pink colour to offset the darker pink of the paint. Cool!
Next I added a little offcut of pink Coredinations card which I embossed with hearts and then sanded back to reveal the colour. I die cut the word Love in dark pink using a Spellbinders die and added some glossy accents to make it stand out a little more.
More hearts, some twine and some sequins to finish. Not forgetting cupid's arrow, which I painted and glossed for extra oomph! A little bit of glitter on her dress and a tag is born, Ta Dah!
I'm going to enter her into the DragonsDream Tag It on Challenge where the theme is Pink and Hearts
Lx
First I needed some layers, so I painted a tag with Orchid Fresco paint by PaperArtsy before layering some dots over the top with texture paste. I've discovered that the paste sucks the colour of the paint up as it dries so I got a gorgeous soft pink colour to offset the darker pink of the paint. Cool!
Next I added a little offcut of pink Coredinations card which I embossed with hearts and then sanded back to reveal the colour. I die cut the word Love in dark pink using a Spellbinders die and added some glossy accents to make it stand out a little more.
More hearts, some twine and some sequins to finish. Not forgetting cupid's arrow, which I painted and glossed for extra oomph! A little bit of glitter on her dress and a tag is born, Ta Dah!
I'm going to enter her into the DragonsDream Tag It on Challenge where the theme is Pink and Hearts
Lx
Subscribe to:
Posts (Atom)